Introduction
What kid doesn’t enjoy a diversion? When I was very young, confined (imprisoned?) to the back seat on a long car trip, I saw a billboard for a Reptile Farm – showcasing Gila monsters and headless snakes! Just 12 miles away! Dad! Alas, he declined… and it made me sad. But today, we fix that with a diversion on our trip to SharePoint Modern. A diversion much longer than 12 miles – in fact – to the far regions of earth and the Cosmos beyond. We won’t see head-less snakes, but we will see server-less functions. So come along.
In all seriousness, the idea for this article came from a meeting I had with an International company headquartered in New York City, with branches across the US, Europe and Japan. They were demonstrating a new “Modern” SharePoint Online company portal, featuring a header that allowed each user to customize the corporate applications appearing in the header. This was more sophisticated than a typical “personal links to websites” customization. I was curious where the user data was stored (fully expecting them to say “in the User Profile Service”). I was surprised to hear “we’re considering Cosmos DB”.
Cosmos what?
SharePoint “User Data” Storage Options
Let’s pause for a moment to consider storage options for SharePoint “user data” (also known in website vernacular as “personalization data”). Typical options include:
- SharePoint site property bags
- SharePoint lists
- SharePoint User Profile Service (UPS)
- External (to SharePoint) storage
Each option has technical and political ramifications. In my opinion, SharePoint property bags are deprecated for SharePoint “modern” sites. That’s because “modern” team & communication sites have scripting capabilities turned off, which disables the ability to access or update site property bag entries. Turning scripting back on is likely to face “political” barriers within an enterprise concerned with governance. So good luck if you go this route.
SharePoint lists are an easier choice technically and politically. That’s because site collection developer(s) rarely need permission from higher authorities to use lists within a site collection. APIs to access and update lists are the bread and butter of any SharePoint developer. Lists also allow personalization tailored on a per-site basis, which is desirable for any enterprise where multiple teams are developing custom site solutions simultaneously – allowing for personalization “loose coupling”.
Another popular option for storing user data is the SharePoint User Profile Service (UPS). Every SharePoint farm (on-premise and cloud) has a UPS…. often with user-specific data pre-populated with user-specific data of questionable freshness and accuracy… where quality depends on how well user data is maintained in an on-premise user identity store – like Active Directory or an LDAP provider – prior to its import into Azure AD and subsequent mapping to the UPS. To use the UPS reliably for personalization – you should create a custom UPS user property that your solution controls. I really like the UPS as an option, but here too are technical and political challenges. Often, the politics are hardest to overcome. First you’ll need permission to provision a custom UPS user property. And then you’ll need help from “that special someone” with access to the SharePoint admin center (or alternatively, to run your PowerShell script). One technical consideration is that storage is limited to 3,000 bytes per user property. So you may need more than one custom UPS user property if your solution exceeds this limit – and a strategy for splitting storage between multiple properties. You’ll also need to make multiple calls to the UPS service – one per user property – so it’s better (less chatty, more performant) if everything fits in a single user property.
Finally, there’s external storage. This is perhaps your most flexible option, allowing for unlimited storage. But this flexibility comes with more technical challenges – like needing a Web API facade over the external data repository. And ensuring that access to the Web API isn’t blocked by browser-based Cross-Origin Resource Sharing (CORS) policies. And secure. And performant. And cost-effective.
Does Azure Cosmos DB provide a flexible, secure, performant solution for storing and retrieving personalization data? Is it easy to implement? Cost effective? Secure? Or is it just the shiny new thing?
I decided to find out. So I wrote a tool to test Cosmos DB performance vs the SharePoint User Profile Service. I wanted to know what the performance implications are for users “far away” from their SharePoint tenant location. For a user in Japan, how long does it take to fetch data from a SharePoint tenant in the US Northeast vs fetching that data from a local instance of Cosmos DB? To find out, I created a multi-geo replicated instance of Cosmos DB and a SharePoint tenant provisioned in the East US region. The resulting effort is my “Cosmos DB Performance Meter” , consisting of a back-end Restful API service to the UPS and Cosmos DB (hosted in 7 regions world-wide with multi-region writes enabled), and a front-end UI to display the results with a colorful barchart (see screenshot below).
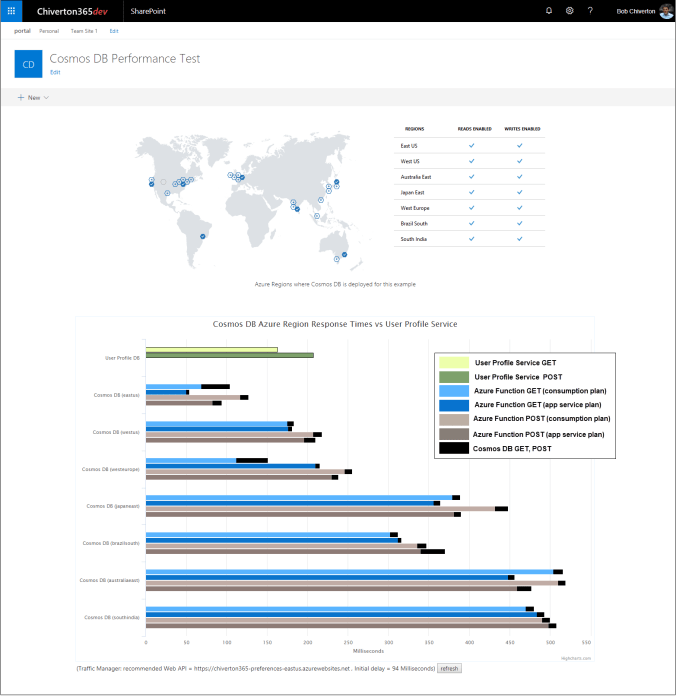
In a nutshell, the barchart shows the time it takes for an SPFx web part to store and retrieve a small amount of JSON data to the UPS and to seven regional instances of Cosmos DB. I ran this test many times, from all seven regions and found it’s much faster to store and retrieve data from a regional instance of Cosmos DB than from the UPS – even when Cosmos DB and the UPS are in the same region. Of course, the farther away the user is from SharePoint (and the SharePoint UPS), the greater the difference, as you’d expect. Take a look at this result from a Windows 10 virtual machine provisioned in the Japan East region:
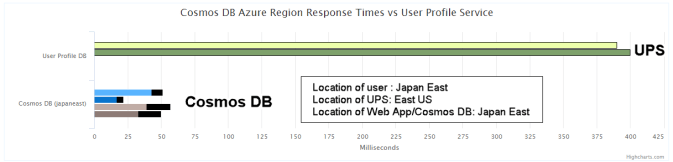
We see it takes 20-50 milliseconds to make a round-trip call from the SPFx web part to Cosmos DB vs 400 milliseconds to go from the SPFx web part to the UPS. This is consistent for the other regions too.
(Readers interested in final results can skip to the end… where I compare performance across all regions tested. For those interested in the more technical aspects, please continue reading).
You’ll soon understand why there are 4 bars per region. For now, notice that each bar consists of two parts – representing the two “hops” needed to reach Cosmos DB from the SPFx web part. The first hop (blue or tan) is from the SPFx web part to an Azure Web App, and the second hop (black) is from the Azure Web to Cosmos DB. The Cosmos DB “hops” – for both reads and writes – were consistently less than 15 milliseconds – and in some cases under 5 milliseconds (but in some cases much longer than 15 milliseconds).
(Microsoft recently released Cosmos DB SDKs allowing reads and writes to a regional instance of Cosmos DB. Prior to that, all writes went to the initial region used to setup Cosmos DB.)
Before I explain how I built this tool – you should know my first design didn’t work. Initially, I wanted an SPFx web part to make REST calls to Cosmos DB directly, using the REST API approach shown in this brilliant video (watch if only to learn advanced Postman techniques). But the problem with this approach is two-fold. In the video, REST calls are made to Cosmos DB from the Postman desktop app – not the Postman browser app where calls to Cosmos DB are blocked by a browser CORS policy. So calls made directly to Cosmos DB from an SPFx web part (hosted in the browser) would also be blocked. The Cosmos DB team informed me that a future release of COSMOS DB will have built-in support for CORS for Restful APIs… but that would not solve the other problem.
The other problem is knowing which Cosmos DB region to use (each geo-replicated instance of Cosmos DB has a unique URL.. which the SPFx web part must account for when making calls to the back-end). Intuitively, you might think the nearest region is most optimal. And you’d be right mostly – but not always – because it depends on network traffic and other factors.
Selecting a location boils down to two choices… let users choose their location or figure it out for them. I prefer the latter…. which is more user-friendly and accommodates users who travel or move to different regions.
I solved both problems – CORS and location – with my second design, using Azure Serverless functions to solve the CORS issue, and Azure Traffic Manager to solve the location issue. The Azure-based architecture is shown in the figures below:

To solve the CORS issue, I configured each Web App to accept REST calls from “chiverton365dev.sharepoint.com” (where the SPFx web part is hosted) to prevent the browser from blocking them.
To see how service plans affect performance, I provisioned – in each region – a Web App with a Consumption plan, another with an Azure App Service plan. Yes… there is a difference… the more expensive Azure App Service plan was usually 5-8% faster, which I attribute to its “always on” feature to avoid startup latencies. With Azure App Service, you specify a “pricing tier”. I chose the S2 tier – which includes 3.5 GB of Ram and 200 “Azure compute units“…. which isn’t too great (1 CPU), but better than the paltry Consumption plan – which is limited to “up to 1.5 GB Ram and 1 core CPU”.
For a realistic enterprise experience, I configured the Web Apps for Azure AD Authentication. I’ll have more to say about this later.
I solved the location issue with Azure Traffic Manager, which automagically ascertains the “closest” geographic location by using DNS resolution to route calls to the Web App with the lowest latency. Azure Traffic Manager uses ICMP echo requests (pings) to DNS servers to create a network latency map. There are some “gotchas” with this approach – whichever Azure region is considered closest is always based on the users local DNS server and not where the users are physically located. So if a user in Japan is using a DNS server physically located in the US, that user is redirected to a Web App in the US.
For my tests, I provisioned client VMs in the same regions where I provisioned Web Apps… so my tests didn’t encounter this “gotcha”.
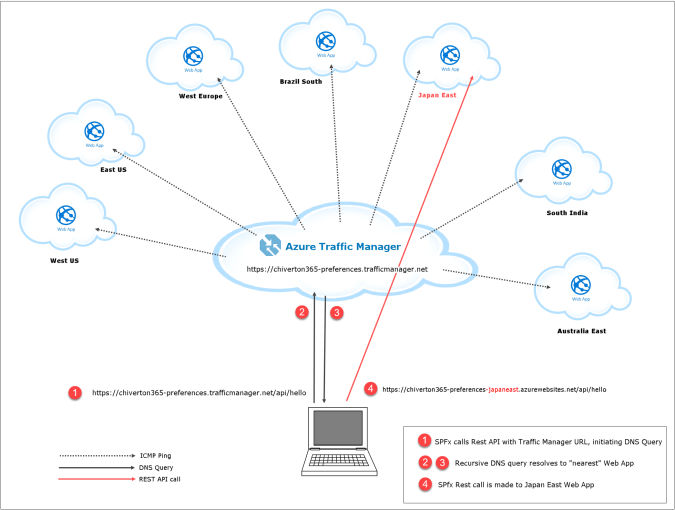
To leverage Azure Traffic Manager for user location, my SPFx web part makes a call to “https://chiverton365-preferences.trafficmanager.net/api/hello” – which Azure Traffic Manager redirects to the “nearest” Web App – which is “Japan East” in the example above. The “hello” function returns two pieces of information – the URL to the regional web app (“https://chiverton365-preferences-japaneast.azurewebsites.net”) and the app ID needed to authenticate the user for subsequent calls to the Japan East Azure Functions.
The hello function does not require user authentication – for performance reasons – but it’s still protected with CORS configured to restrict calls only from “allowed sources” (https://chiverton365dev.sharepoint.com).
Once the user location is obtained… it’s cached for the duration of the user’s session.
Azure Cosmos DB
Microsoft describes Azure Cosmos DB as “A database for building blazing fast, planet scale applications with native support for NoSQL”. Wow…. planet scale. And by gosh… I did send data across the planet. With a click. From my desk. And that impressed me. And indeed, Cosmos DB reads and writes are fast… often under 10 milliseconds (mostly… more on that later).
I also found Azure Cosmos DB exceedingly easy to use. This was my first experience with a NoSQL database, and I wanted to store (and retrieve) an array of “favorite links”, and a “color” property thrown in for good measure, using the user’s email address as the “primary key”. Here is the JSON string I wanted to store:
{
"id":"user2@domain.com",

"links":[
  { "title":"title1", "url":"url1"},
  { "title":"title2", "url":"url2"},
  { "title":"title3", "url":"url3"},
  { "title":"title4", "url":"url4"},
  { "title":"title5", "url":"url5"},
  { "title":"title6", "url":"url6"},
  { "title":"title7", "url":"url7"},
  { "title":"title8", "url":"url8"},
  { "title":"title9", "url":"url9"},
  { "title":"title10","url":"url10"}
  ],

"color":"red"
}
Coming from MS SQL Server world – where I’ve written my share of T-SQL, designed my share of schemas and tables – I find it comical how easy Azure Cosmos DB is to use. To store that JSON data above, there is no need for schemas, stored procedures, tables, joins, or complicated connection settings… I didn’t need any of that.
Azure Cosmos DB provides several APIs for working with it, depending on your preferred style. I chose the “SQL API” style. I also explored two different “SQL API” SDKs – the JavaScript 2.x SDK and C# .Net Core 2.x SDK – to compare them for ease of use and performance. I found them equally easy to use, and equally performant. I did not look at the Java SDK.
Stripped to its essence, here is the code to asynchronously insert (or update) JSON data into Azure Cosmos DB (via the JavaScript 2.x SDK):
await client.database("myDB").container("myTable").items.upsert(json-data);
await client.UpsertDocumentAsync("myTable", json-data, null, true);
const item = await client.database("myDB").container("myTable").item(id);
const i = await item.read<IMyData>();
You pass in an id and get back an item. Of course, there are other ways to do this… all similarly easy.
Here is the C# version:
Uri uri = UriFactory.CreateDocumentUri("myDB", "myTable", id);
Document item = await client.ReadDocumentAsync(uri);
Azure Cosmos DB configuration had minimal setup ceremony. And comes with a local emulator for development.
The SPFx AadHttpClient
Oh how I adore the AadHttpClient class in SPFx (AadHttpClient was introduced in v1.4.1, but I used v1.6 to build my tool) It makes it easy to call Restful APIs requiring Azure AD authentication (that’s OAuth 2.0 OpenID Connect with implicit flow to the cognoscenti among you). Prior to this class… you had to bolt on a custom solution… typically hacking the ADAL.js library… and deal with several issues. Here’s a wonderful blog on all that.
Here’s a stripped-down version of a TypeScript function I used in my SPFx web part to show how easy it is to make calls to functions secured with Azure AD:
private async getWebAppTiming (region:webAppRegion ) :Promise<ITimingData>
{
let aadClient :AadHttpClient;
:

try
{
// Post data to Cosmos DB, and get data from Cosmos DB
//

switch (region)
  {
  case"eastus":
   {
   if (this.aadClientEASTUS===undefined)
     {
     this.aadClientEASTUS = await this.context.aadHttpClientFactory.getClient(webapp_appid);
     }

   aadClient = this.aadClientEASTUS;
   break;
   }
    :
    :   (handle other regions)
    :
  }

const requestHeaders :Headers = new Headers();
requestHeaders.append('Content-type', 'application/json');
requestHeaders.append('Cache-Control', 'no-cache');

const requestOptions :IHttpClientOptions = {
      headers :requestHeaders,
      body :JSON.stringify(testdata)
      };
:
let clientPostResponse :HttpClientResponse = await aadClient.post(webapp_uri + '/api/preferences', AadHttpClient.configurations.v1, requestOptions);
if (clientPostResponse.ok) // check POST response
   {
   // process POST response
   }

let clientGetResponse :HttpClientResponse = await aadClient.get (webapp_uri + '/api/preferences/user2@domain.com', AadHttpClient.configurations.v1);
if (clientGetResponse.ok) // check GET response
   {
   // process GET response
   }
   :
}

return new Promise<ITimingData>(resolve=> {
    resolve(waTiming);
});

}
I’ll cover both server-side & front-end code in detail in a follow-up blog article… but you can see above how easy it is to setup and call a secured function using the AadHttpClient class. Behind the scenes… this class is performing a ton of work negotiating with Azure AD to validate the user’s credentials – using hidden IFrames, and tokens and “all that other OAuth stuff” that we don’t need to know. But you will need a solid understanding of async/await… since Restful APIs are asynchronous.
Key Findings
The results from my Cosmos DB Performance Meter tests were clear – users from any other region will take one tenth the time to fetch (and store) their personalized data with Cosmos DB in their region vs using the SharePoint UPS in a distant tenant. You can expect even better results if that data exceeds 3,000 bytes – because then you’d need multiple trips to the UPS.
Of course, you’ll want to weigh any speed improvements against the cost of Cosmos DB and the Azure Web Apps.
These performance results were consistent regardless of Azure Function runtime (1.x vs 2.x) or language (TypeScript vs C#) used. As I mentioned earlier, I did see a slight increase in performance using the Azure App Service Plan vs the Consumption Plan… but this too comes at a higher cost you’ll want to weigh. Here are the results for the Web Apps using the 1.x (node 6.5) runtime and TypeScript :

Next Steps
I hope you’ve found this article useful. In the next article, I’ll explain the code used to implement my Azure Functions “microservice” Web API, and cover the back-end configuration too – there’s a lot of it (Azure AD authentication, web api proxies, and cosmos DB SDK peculiarities). I’ll also discuss the SPFx React component that displays the performance results – how I handled the multiple asynchronous calls to the microservice using asynch/await (there is a good way, and a not-so-good way) and how I leveraged a wonderful D3 chart component for my stacked bar chart.
I do hope you’re enjoying this excursion, on our trip to SharePoint Modern.
-bob chiverton


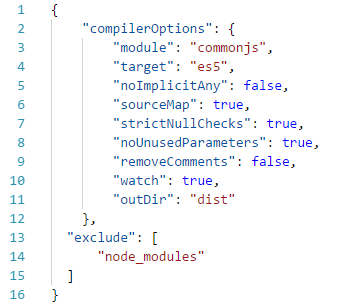

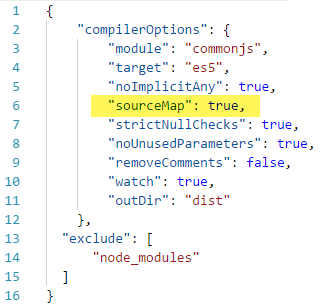
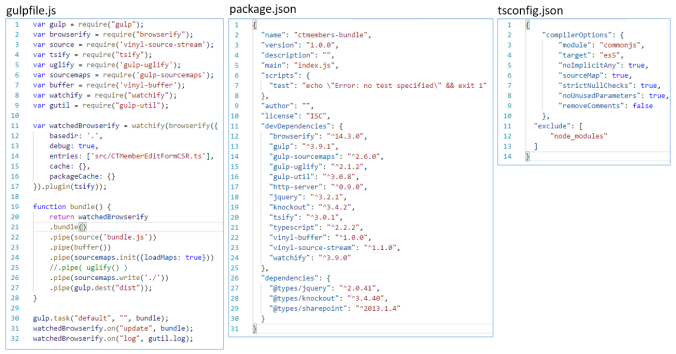
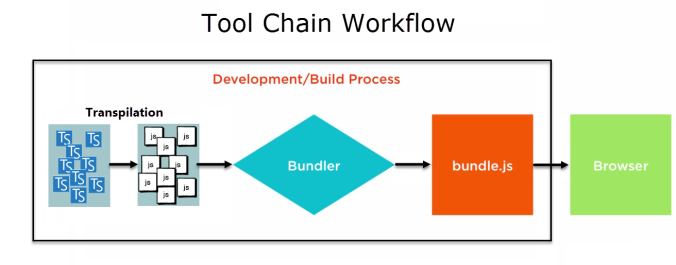 The “Browserify Tool Chain” required several npm packages, a simplified tsconfig.json file, and gulp to co-ordinate the transpilation, bundling and minification tasks. The three files that control it all are shown below (and familiar if you’ve used gulp before):